Contents:
- What Exactly Is a French Braid?
- Getting Your Hair Ready
- Texture and Product Preparation
- Sectioning and Detangling
- The Step-by-Step Technique
- Step 1: Create Your Starting Section
- Step 2: Understand the Crossing Pattern
- Step 3: Begin Incorporating Loose Hair
- Step 4: Finish the Braid
- Common Mistakes and How to Fix Them
- The Braid Is Lumpy or Uneven
- Hair Falls Out as You Go
- The Braid Twists or Spirals
- Braid Looks Too Loose
- What the Pros Know: The Pancaking Trick
- Styling Your French Braid
- The Classic Side-Swept Braid
- The Double French Braid
- The Halo Braid
- How to Make Your Braid Last Longer
- Troubleshooting by Hair Type
- Fine or Thin Hair
- Thick or Curly Hair
- Straight Hair
- Practice Schedule and Expectations
- Budget-Friendly Supplies You’ll Need
- Frequently Asked Questions
- How long does it take to braid your own hair?
- Can you do a French braid on short hair?
- What’s the difference between a French braid and a fishtail braid?
- Will French braiding damage my hair?
- Can you French braid wet hair?
- Taking Your Skills Forward
Did you know that French braids have been documented in African cultures for over 100 years, but it wasn’t until the 1970s that they became a mainstream Western hairstyle trend? Today, learning how to french braid your own hair is one of the most practical beauty skills you can master—and it’ll save you hundreds of pounds over a lifetime of salon visits.
The truth is, mastering this elegant style doesn’t require expensive tools, professional training, or even particularly thick hair. What you need is patience, practice, and the right technique. This guide walks you through everything, from the absolute basics to troubleshooting common mistakes, so you can create salon-quality braids at home without the salon price tag.
What Exactly Is a French Braid?
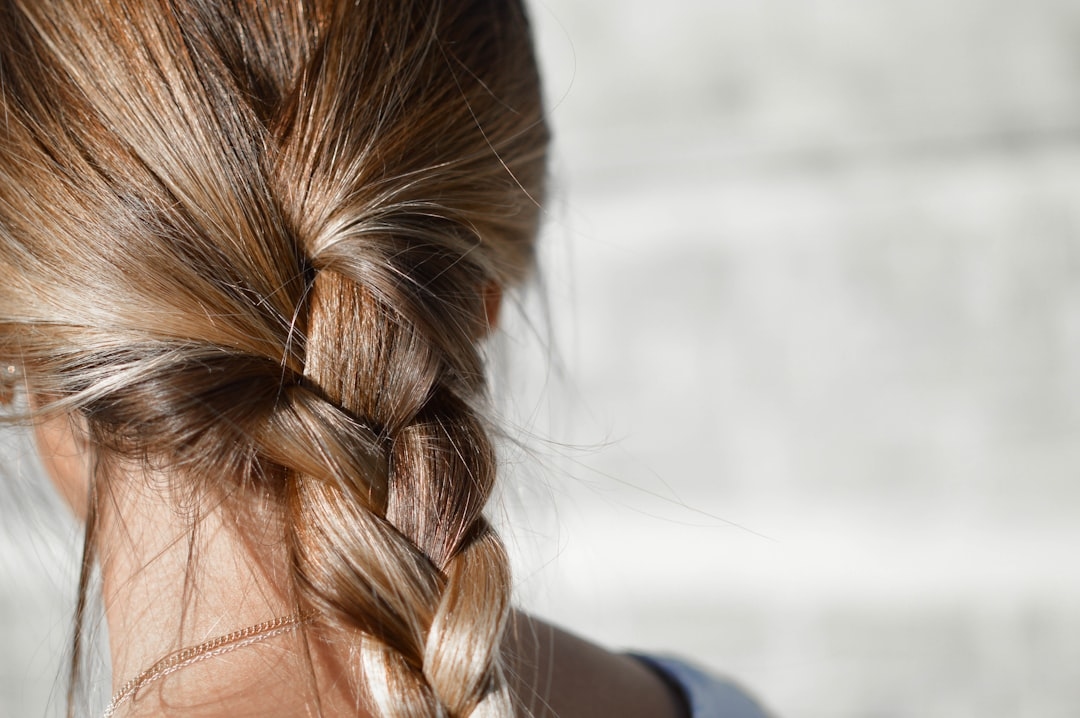
A French braid is a three-strand braid that starts at the crown of your head and incorporates loose hair as you work your way down. Unlike a standard braid where you simply plait three sections, a French braid continuously feeds new sections into the braid as you progress, creating an intricate, woven pattern that looks far more complex than it actually is.
The confusion often arises between French braids and Dutch braids—and for good reason. The two are deceptively similar, but the difference is crucial. A Dutch braid is essentially the reverse of a French braid. Instead of plaiting the sections over each other, you plait them under. This creates a braid that sits more prominently on the scalp and appears to pop off the head. Dutch braids give a bolder, more textured appearance, while French braids look sleeker and more polished. If you’re aiming for a refined, unified look, French is your answer. If you want something edgier, Dutch wins.
Getting Your Hair Ready
Success with how to french braid your own hair starts long before you begin braiding. Hair preparation makes the difference between a braid that holds for eight hours and one that falls apart by lunchtime.
Texture and Product Preparation
Fresh, clean hair is actually harder to braid than hair that’s a day or two old. Natural oils and texture make strands grip each other better. If you’re starting with freshly washed hair, apply a light texturising spray—brands like Bumble and bumble or a budget option from any supermarket work equally well. Spray it 15-20 minutes before braiding and run your fingers through to distribute evenly.
For finer hair, a volumising mousse applied to damp roots and dried before braiding adds grip without weighing things down. Budget-conscious? A sprinkle of dry shampoo or baby powder at the roots works brilliantly and costs under £2.
If your hair tends toward flyaways and frizz, apply a smoothing serum or oil to the outer layer only—just a few drops smoothed through the mid-lengths and ends. Don’t oversaturate or your braid won’t hold.
Sectioning and Detangling
Thoroughly detangle your hair before you start. Use a wide-tooth comb or paddle brush, beginning at the ends and working upward. Matted or knotted sections will tighten uncomfortably as you braid and can even pull out hair. Budget tip: a £3 wide-tooth comb lasts years and is genuinely better than expensive alternatives.
Part your hair down the centre or to the side—whichever feels natural for your face shape. This isn’t a fixed rule, but it helps with symmetry, especially when you’re learning.
The Step-by-Step Technique
Step 1: Create Your Starting Section
At the crown of your head, just behind your hairline, take a section of hair roughly the width of your thumb. This becomes your three base strands. Mentally label them: left, middle, and right. This mental labelling is what the pros know—it eliminates confusion and keeps your hands moving consistently.
Divide this section into three equal parts. They don’t need to be perfect, but roughly equal sizing creates a more uniform braid.
Step 2: Understand the Crossing Pattern
Here’s the core technique: cross the left strand over the middle strand (so left becomes middle), then cross the right strand over the new middle strand (so right becomes middle). You’re alternating which outer strand you bring to the centre.
Do this three times with just these base strands, creating a small traditional braid at your crown. This establishes the rhythm and foundation.
Step 3: Begin Incorporating Loose Hair
This is where the magic happens. After your third cross, instead of simply crossing the left strand to the middle, grab a thin section of hair from the left side of your head (at about ear level) and add it to your left strand before crossing over. The size of this addition matters: roughly the thickness of a pencil works well.
Cross your now-thicker left strand over the middle. Then grab a matching section from the right side, add it to the right strand, and cross it over the middle.
Continue this alternating pattern—pick up, incorporate, cross—all the way down to the nape of your neck. You’ll gradually incorporate all of your hair, and the braid will expand as you go.
Step 4: Finish the Braid
Once you’ve reached the nape of your neck and incorporated all the loose hair, you’ll have three remaining strands. Complete these as a simple three-strand braid for 2-3 more crosses. Secure the end with an elastic band. A clear or nearly-invisible elastic blends better than bright colors, but any elastic works fine.
If your braid ends before your hair does, you can either leave the remaining hair loose or continue braiding to the very end of your hair length. Both are perfectly acceptable styles.
Common Mistakes and How to Fix Them
The Braid Is Lumpy or Uneven
This usually means you’re adding different amounts of hair on each side. Focus on making your picked-up sections consistent. You’ll notice improvement within your second or third attempt—this is completely normal and not a failure.
Hair Falls Out as You Go
Either your sectioning isn’t tight enough, or you need more texture in your hair. Try: tightening your grip slightly as you cross strands, or applying texturising spray 30 minutes before braiding instead of 15.
The Braid Twists or Spirals
You’re likely crossing strands in the wrong direction or not maintaining consistent over-crosses. Pause, take a breath, and do three clear practice crosses with just your starting section. Find your rhythm again, then continue.
Braid Looks Too Loose
Some tension is good—you want your braid snug enough to last but not so tight you’re creating tension headaches. If it’s too loose, gently pull each section as you move down the braid after completing it. Start at the top and work down, pulling from the underside of each loop. This “pancaking” technique makes a loose braid look fuller and more intentional within seconds.
What the Pros Know: The Pancaking Trick
Professional stylists rarely leave a braid in its default state. After completing it, they spend 30 seconds gently pulling sections of the braid outward and slightly downward to create a fuller, more textured appearance. This technique is called pancaking, and it transforms a braid from neat to genuinely impressive.
To pancake: starting at the top of your finished braid, pinch each crossover point and gently pull the section toward you and slightly down. You’ll see the braid widen and develop depth. This works on both French and Dutch braids and is the secret behind why salon braids look so much more polished.
Styling Your French Braid
The Classic Side-Swept Braid
Begin your braid at the temple (side of your head near your hairline) instead of the crown. Braid diagonally across toward the opposite ear. This creates a romantic, face-framing effect and is forgiving for beginners because the technique remains identical—you’re just changing where you start.
The Double French Braid
Part your hair down the centre and create one French braid on each side. This takes roughly twice as long but looks striking and is actually easier than you’d think once you’ve mastered a single braid. The division means each braid is thinner and faster to complete.
The Halo Braid
Start your braid at one temple, work it around the back of your head in a horizontal line, and finish near the opposite temple. This creates a crown-like effect. It sounds complex but uses the identical technique—you’re simply changing your path direction. Practice this once you’re confident with the basic method.
How to Make Your Braid Last Longer
A well-executed French braid should last 8-12 hours before it begins loosening noticeably. To extend this:
- Use a light hairspray: Don’t saturate. A light mist (not a drenching spray) every 3-4 hours refreshes hold without making hair sticky. Budget options work fine—you’re not paying for brand names here.
- Sleep in a braid: Loosely redo your braid before bed, securing it gently. Morning braids often look fuller because overnight they’ve relaxed slightly, creating that coveted textured look.
- Avoid touching it: Each time you run your fingers through or adjust a braid, you’re slightly loosening it. Discipline here pays off.
- Use the right elastic: Thick elastics break hair; tiny elastics slip. Medium-weight, seamless hair elastics (around £3-5 for a pack) are worth the investment.
Troubleshooting by Hair Type
Fine or Thin Hair
You need maximum grip. Use volumising mousse on damp roots, dry shampoo at the roots, and create your braid on day-old hair rather than freshly washed hair. Work with slightly tighter sections than you might with thick hair—this creates better definition. Your braid won’t appear as thick, but it will look intentional and polished.
Thick or Curly Hair
Your advantage is grip—your hair naturally holds braids beautifully. Your challenge is preventing frizz. Apply a curl-defining cream or lightweight serum before braiding. Work in sections if your hair is particularly thick; you might find it easier to do a side-swept braid rather than a centre-crown braid simply because the angle feels more comfortable.
Straight Hair
Straight hair is often slippery, so texture is crucial. Texturising spray is your friend. Apply it generously 20-30 minutes before braiding. Dry shampoo works equally well and costs less. The trade-off is that straight hair shows braid texture and definition beautifully once you pancake it.
Practice Schedule and Expectations
Your first attempt might take 15-20 minutes and look imperfect. That’s completely normal. Your fifth attempt might take 10 minutes. By your tenth attempt, you’ll hit 5-8 minutes and notice your braid looking noticeably neater.
Practice twice weekly for two weeks. That’s roughly six practice sessions—enough to build muscle memory without frustration. Most people find that around session five or six, something clicks and the motion becomes intuitive rather than conscious.
One reader shared her breakthrough moment: “I was convinced I had no coordination because my braids looked lumpy. Then I realized I was gripping too hard and creating tension. The moment I relaxed my hands, everything clicked. I actually do have coordination—I was just fighting myself.”
Budget-Friendly Supplies You’ll Need
You genuinely don’t need expensive products. Here’s what actually matters:
- Texturising spray: £2-5 (budget brands are identical to expensive ones)
- Hair elastics: £3-5 for a pack of 50
- Wide-tooth comb: £3-4
- Optional: paddle brush: £5-8
Total investment: under £20, and these supplies last months. Compare that to a single salon braid at £15-30, and you break even after one or two successful home braids.
Frequently Asked Questions
How long does it take to braid your own hair?
Once you’re confident, 5-8 minutes. As a beginner, expect 10-15 minutes for your first attempts. Speed improves with practice as muscle memory develops.
Can you do a French braid on short hair?
Technically yes, but it needs to be at least 20-25 cm long to create a noticeable braid. Shorter hair can be braided but won’t have much length to work with. Medium to long hair (shoulder length and beyond) is ideal.
What’s the difference between a French braid and a fishtail braid?
A French braid uses three strands that cross over each other. A fishtail braid uses two thin strands from the outer edges and crosses them toward the centre, creating a delicate, interlocking pattern. Fishtail braids take longer but give a more intricate, textured result. French braids are faster and more classic.
Will French braiding damage my hair?
Not if done correctly. Avoid braiding too tightly, especially if you have fine hair or hair that’s prone to breakage. Never yank strands or create excessive tension. A gentle, well-executed braid won’t cause damage. If you experience discomfort, you’re pulling too hard—ease up.
Can you French braid wet hair?
It’s possible but not ideal. Wet hair is slippery and stretches easily, making it prone to breakage. Wait until your hair is at least 80-90% dry. Braiding damp hair with texturising spray is fine—braiding soaking wet hair isn’t recommended.
Taking Your Skills Forward
Once you’ve mastered the basic French braid, you have a foundation for countless variations. Side-swept braids, halo braids, double braids, and elaborate crown designs all use the identical core technique. You’ve already done the hard part—understanding the over-cross pattern and the rhythm of adding hair as you progress.
The next step is experimenting with placement and direction. Start your braid in different locations on your head. Braid at different angles. Try two braids instead of one. Each variation uses the exact same technique but creates entirely different styles.
More importantly, you’ve unlocked a skill that’ll pay for itself many times over. Every braid you create at home instead of the salon is £15-30 in your pocket. Over a year, if you braid your own hair even twice a month, you’re saving £360-720. That’s a luxury holiday fund created by a skill that takes minutes.
Start practicing this week. Expect your first attempts to be imperfect—that’s the learning process, not failure. By next week, you’ll notice improvement. By next month, you’ll confidently create braids that rival salon work. Your budget, your schedule, and your hair will all thank you.