Contents:
- Why Layers Matter More Than You Think
- Essential Tools for Cutting Layers
- The Right Scissors Make Everything Easier
- Other Essentials
- Understanding Hair Texture and Density
- How to Cut Layers: The Step-by-Step Process
- Step 1: Section Your Hair Properly
- Step 2: Establish Your Guide
- Step 3: Continue the Back Section
- Step 4: Move to the Sides
- Step 5: Shape the Crown
- Step 6: Frame the Face
- Advanced Techniques: Texturising and Point Cutting
- Point Cutting for Feathered Edges
- Texturising for Volume and Movement
- Common Mistakes and How to Avoid Them
- Styling Your New Layered Cut
- How Long Should You Wait Between Cuts?
- FAQs About Cutting Layers
- Can I cut layers into curly or textured hair?
- How much should I cut off when creating layers?
- What’s the difference between feathered and layered?
- Do layers make thin hair look thinner?
- Can I cut layers without professional training?
- Taking Your Skills Further
Layered haircuts look effortless—but they’re actually the result of precision, angles, and understanding exactly how to direct scissors. Whether you’re a professional stylist looking to refine your technique or someone curious about what happens behind the salon chair, learning how to cut layers in hair unlocks one of the most versatile tools in modern hairstyling.
Why Layers Matter More Than You Think
Layers serve a practical purpose beyond aesthetics. They remove bulk from thick hair, add movement to flat or fine hair, and create the illusion of shape even when hair naturally lacks texture. A well-executed layered cut can last 6-8 weeks before looking shaggy, whereas a blunt cut often looks overgrown after 4-5 weeks.
The regional approach to layering varies dramatically. On the West Coast, you’ll find softer, feathered layers with subtle texture and movement—think beachy and undone. The Northeast tends toward more structured, geometric layers with defined lines and sharper angles. Southern stylists often favour longer, more conservative layers that maintain length while still building movement. Understanding which aesthetic appeals to you helps determine how you’ll approach the cut.
The science behind why layers work comes down to weight distribution. When you remove length from the bottom third of thick hair, you’re not just making it shorter—you’re reducing the gravitational pull that flattens natural waves and curls. This is why layered cuts often look better on days two and three, after natural texture has time to settle.
Essential Tools for Cutting Layers
Don’t attempt this with kitchen scissors or dull crafting shears. The difference between a £15 pair of scissors and professional-grade shears is immediately visible in the finished cut.
The Right Scissors Make Everything Easier
Professional hair scissors cost between £40-£150, and the investment pays dividends. Barber shears, designed for precision and control, feature a shorter blade (around 15cm) and offer better leverage than longer salon scissors. They should feel balanced in your hand—not tilted one way or the other. When testing scissors, you should be able to cut a single strand of hair cleanly without pressing. If you need pressure to cut, they’re too dull or poorly balanced.
Texturising scissors (also called thinning shears) remove bulk without visible lines. They typically have teeth on one or both blades and cost £50-£100. These work best on already-cut layers, not as your primary cutting tool.
Other Essentials
- Sectioning clips: You’ll need 4-6 sturdy clips to divide the head into workable sections. Butterfly clips or crocodile clips cost £3-£8 each.
- Wide-tooth comb: Detangles gently without creating breakage. Essential for assessing texture and working through thick hair.
- Spray bottle: Damp (not soaking wet) hair cuts more predictably than bone-dry hair. Mist lightly as you work.
- Cutting mat or towel: Protects surfaces and helps you see fallen hair clearly, showing you exactly how much you’re removing.
- Mirror setup: A handheld mirror plus a wall-mounted mirror lets you see the back. If cutting your own hair, position mirrors so you can see both profiles.
Understanding Hair Texture and Density
The same layering technique doesn’t work for every hair type. Straight, fine hair needs gentler layers spaced further apart or you’ll end up with wispy, disconnected sections. Curly or textured hair often needs closer layers to work with the natural curl pattern and prevent a heavy triangle shape.
Density matters equally. Thick, dense hair can handle layers that are more dramatic (deeper in length), while fine hair benefits from subtle layers that add movement without creating see-through gaps. As a rule, aim to remove no more than 2-3cm from the shortest layer if you have fine hair, and up to 5-7cm if you have thick or very thick hair.
Test your hair’s texture by looking at a single strand under natural light. Straight strands catch light uniformly. Wavy or curly strands show variation. This determines whether you’re cutting against the natural curve (which shapes curly hair better) or parallel to it.
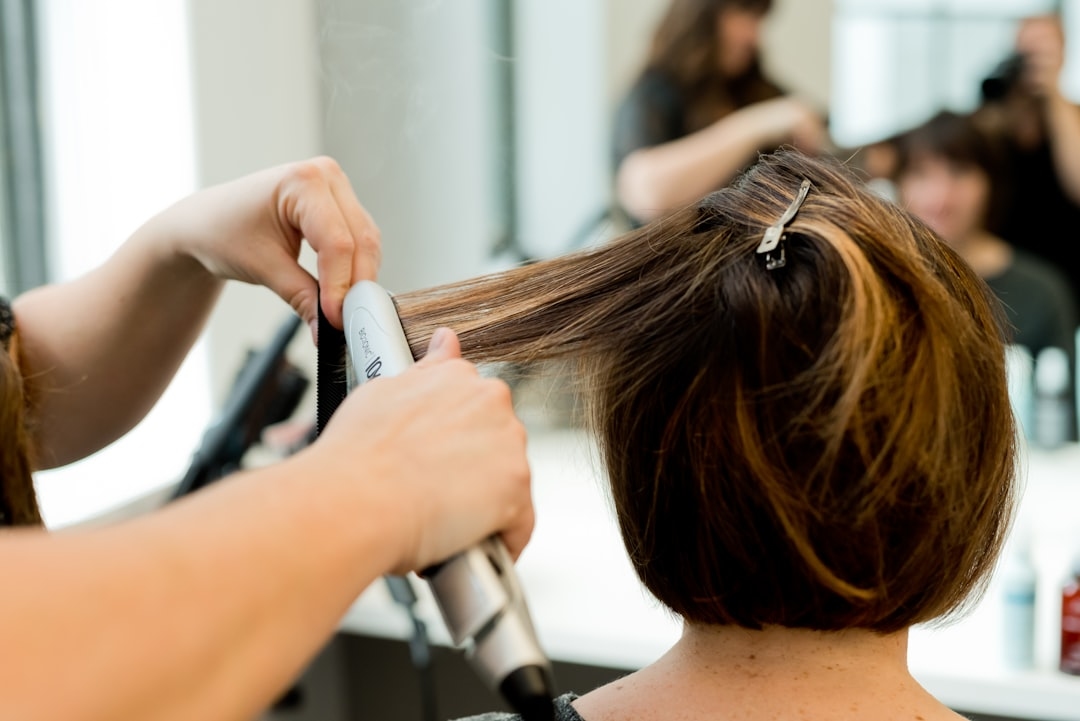
How to Cut Layers: The Step-by-Step Process
Step 1: Section Your Hair Properly
Divide your head into five sections: front-left, front-right, crown, left-side, and right-side. Create clean lines from your forehead back toward your crown, then separate the sides from the back. Clip everything except your working section. This prevents cutting more than intended and makes it impossible to miss spots.
Start at the back (the nape area), as this is your foundation. The back layer should be your shortest, and everything in front gets progressively longer—this creates the movement you’re aiming for.
Step 2: Establish Your Guide
Take a thin subsection from the nape (about 2cm wide) and comb straight down. This becomes your guide. Cut this first subsection to your target length—this is usually 2-4cm shorter than your overall hair length. Every other layer will reference this guide, so get it right.
Hold your scissors at the angle you want to cut. For layered cuts, scissors aren’t held perpendicular to the ground (90 degrees). Instead, angle them at 45-60 degrees away from the head for that graduated, tapered effect. Some techniques use 90-degree angles at the crown for volume, then transition to 45 degrees toward the ends.
Step 3: Continue the Back Section
Create vertical subsections (each about 2cm wide) and continue cutting, using your first guide strand as reference. Comb each subsection down, align it with the previous cut, and cut using the same angle. You’ll work your way from the nape upward to the crown.
The key mistake here: cutting straight across instead of maintaining your angle. If you shift from 45 degrees to 90 degrees, you’ll create a blunt line instead of a gradient. Consistency in angle is what creates seamless layers.
Step 4: Move to the Sides
Release one side section. Comb it down and establish a guide from the back section you just completed. Your side section should blend smoothly with the back—no harsh lines where they meet. This often requires slightly longer layers on the side than the back to account for the head’s natural curve.
Work from the nape upward here too, maintaining your chosen angle. Many people create slightly longer layers at the face to frame it, which involves shifting your angle slightly (perhaps from 45 to 60 degrees) as you approach the front.
Step 5: Shape the Crown
The crown needs special attention. Cutting too much here creates bulk that’s hard to style. Cutting too little wastes the layers you’ve done elsewhere. Generally, crown layers should remove 1-2cm of length, not more.
Use the sides as your guide. Position subsections so they flow from side to side, and cut at your chosen angle. If you’re after maximum volume, use a 90-degree angle at the crown. For a more textured look, maintain 45-60 degrees throughout.
Step 6: Frame the Face
Front sections set the tone for how dramatic your layers look. Face-framing layers are typically your longest, especially if you’re maintaining overall length. Many stylists cut these slightly longer than the corresponding side layers, creating a subtle U-shape around the face.
For face-framing, use a 45-degree angle angling the scissors downward and outward, away from the face. This removes length from the underlayer without creating a blunt line. Test the angle on a small subsection first—this is where mistakes show most obviously.
Advanced Techniques: Texturising and Point Cutting
Once your basic layers are complete, two techniques add extra texture and movement.
Point Cutting for Feathered Edges
Hold scissors vertically and make small cuts into the hair ends, rather than cutting parallel to the floor. This creates piece-y, feathered edges instead of blunt ends. Use this on the underlayer of each section to break up any lines and add a beachy, undone quality. This technique requires practice—too much point cutting creates a choppy appearance that doesn’t work for all styles.
Texturising for Volume and Movement
After completing your layers, use texturising scissors through the mid-lengths and ends to remove bulk. Hold a subsection at a 45-degree angle and make quick cuts with the texturising shears, working from roots toward ends. This thins the hair without creating visible gaps. It’s especially effective on thick hair and curly hair where you want to enhance natural texture.
A warning: texturising scissors can damage hair if overused. A professional typically uses them sparingly, making 3-5 cuts per subsection maximum, not dozens.
Common Mistakes and How to Avoid Them
Cutting while hair is soaking wet. Wet hair stretches and appears longer than it is. When it dries, you’ll discover you cut more than intended. Always damp-cut, never dripping wet.
Inconsistent angles. The most common reason layered cuts look uneven is angle inconsistency. Mark your angle with your body position before you start, and maintain it throughout. Some stylists tape a guide angle on their mirror.
Creating disconnected sections. If your layers look segmented instead of blended, you’ve likely cut too much length from the top layers, or you haven’t used the previous section as a proper guide. Layers should flow into each other, not sit separately.
Forgetting about cowlicks and growth patterns. Hair doesn’t grow uniformly. Some people have cowlicks at the nape or crown that fight against layered cuts. Work with these patterns, not against them, or you’ll spend years fighting your hair when styling.
Making layers too short too quickly. It’s easier to remove more length later than to glue your hair back on. Cut conservatively on your first pass. You can always take more off in a second pass if the layers don’t have enough movement.
Styling Your New Layered Cut
A layered cut looks dramatically different depending on how you style it. This is where your work either shines or falls flat.
Blow-dried straight: Layers create movement and texture, especially visible at the ends. Blow-dry your roots to build volume, then flip your head and rough-dry the ends to separate them. Finish with a round brush to smooth or curl the ends slightly.
With waves or curls: Apply a curl-enhancing product to damp hair and scrunch upward as you air-dry, or use a diffuser attachment on your blow dryer. Layers work with your natural pattern instead of against it.
Tousled texture: This requires texturising paste or sea-salt spray. Work the product through damp hair, scrunching and twisting sections as you go. Let it air-dry for a lived-in look.
How Long Should You Wait Between Cuts?
Layered cuts typically need maintenance every 6-8 weeks to keep them looking intentional. The shorter the layers, the more frequently you’ll need trims. A dramatic cut with short, feathered layers might need attention every 4-5 weeks, while subtle layers can stretch to 8-10 weeks.
Between cuts, dry cutting (cutting on completely dry hair) can help refine shape, though this is advanced and easy to mess up. Most people benefit from sticking with professional cuts and focusing on styling between appointments.
FAQs About Cutting Layers
Can I cut layers into curly or textured hair?
Yes, and it often improves the shape. Curly hair benefits from layers that work with (not against) the curl pattern. However, you must cut curly hair while it’s damp and in its natural curl state, never while straight or soaking wet. The layers will look different when your curls dry than they do when wet, so professionals account for this by cutting slightly longer.
How much should I cut off when creating layers?
For a face-framing layer, cut 2-5cm depending on your hair length and desired drama. For internal layers, remove 1-3cm per layer. If starting from a blunt cut, removing 5-7cm total (spread across multiple layers) creates noticeable movement without losing length dramatically.
What’s the difference between feathered and layered?
All feathered cuts are layered, but not all layered cuts are feathered. Feathering involves point-cutting and texturising to create soft, piece-y edges. Straight layers (cut with blunt scissors) create cleaner lines and visible layers. Choose feathering for movement and softness, straight layers for definition and structure.
Do layers make thin hair look thinner?
Not if done correctly. Layers on fine hair should be subtle and placed strategically to create the illusion of fullness without creating gaps. Avoid layers that stack heavily at the crown, as these can show scalp. Instead, focus on face-framing layers and gentle internal layers in the mid-lengths.
Can I cut layers without professional training?
You can try, especially on your own hair where mistakes are less visible than on a client. But layering requires understanding angles, hair growth patterns, and texture. Most people benefit from at least one professional cut to establish the shape, then maintenance trims at home if desired. If attempting self-cutting, start very conservatively—you can always take more off, but you can’t put it back.
Taking Your Skills Further
If you’ve mastered basic layering, the next step is studying how different angles create different effects. A 30-degree angle creates a more blended, feathered appearance. A 90-degree angle (especially at the crown) builds volume. Most skilled stylists combine angles throughout a single cut, using 45 degrees as a middle ground that works for most hair types.
The best way to improve is to cut regularly and study the results. Notice how your layers photograph in different light, how they move when dry, and where clients ask for adjustments. Each cut teaches you something about hair structure and technique that no tutorial fully captures.
If you’re cutting professionally, invest in your scissors immediately. A £100 pair of quality shears will improve your work noticeably within a week. If you’re cutting at home, the investment is smaller but equally worthwhile—one quality pair beats five cheap pairs.
Start with clients or your own hair that you’re willing to experiment on. The first layered cut always feels vulnerable, but once you’ve completed one successfully, the anxiety disappears. You’ve understood the mechanics, seen the result, and know you can do it again.